
Recruiting App by CloudGofer
Admin/User Guide v1.9
Last updated: Dec 10 , 2019
Overview
Recruiting App enables a well defined recruiting process to manage and track progress of job openings, applicants, candidates and also send automated emails and extend and connect with your CRM.
Process Flow
The App is based on concept of how a recruiter and hiring manager typically works. Recruiter mainly works on Applicants and once reviewed and shortlisted, recruiter converts an applicant to candidate and passes on to the hiring manager. Applicant is converted to Candidate when the applicant status is set to “Convert to Candidate”. If there is an existing candidate with same email address as applicant then existing candidate record is updated (key fields are logged in Candidate History related list).
Thought Process
Out of an applicant pool of 100-200, you might only identify 10-15 candidates. Applicants are job seekers who have “applied” for your job opening. Candidates on the other hand are applicants that you have screened and deemed minimally qualified for the job opening.
Features and Configuration
The App consists of custom objects (Jobs, Applicants, Candidates and Interviews), Process Flow to convert Applicant to Candidate, Trigger to link candidate to applicant(s), Reports (Applicant pipeline, Candidate pipeline) and a dashboard showing recruiting pipeline
Reports and Dashboard

Applicant and Candidate pipeline dashboard shows the funnel of respective records by status.
Platform Configurations
Email templates: Update email templates in “Recruiting App” folder to suit your needs, currently it has CloudGofer templates.
Custom label: Used for header of the apply page on Site. Update it as per your needs.
Workflow Rules: Update to perform different actions, firing of emails on different statuses of applicant, etc.
App Settings

- AutoConvert Job Application to Candidate: when set to Yes, Job Applications would be automatically converted to Candidate. Values: Yes, No, Default Value: Yes
- External Site URL: External URL for Job Listing Site or Community. Used for link to Google Jobs Schema verification (available on Job detail page)
- Resume File on Apply Page: Setting to configure resume file validation on external site Apply page, Default Value: Required. Values: Required, Optional
Setting up Community
Step 1 : From Setup, enter Communities Settings in the Quick Find box, then select Communities Settings.
Step 2 : Select Enable communities.
Step 3 : Select a domain name for your communities, and click Check Availability to make sure that it’s not already in use.
We suggest that you use something recognizable to your users, such as your company name. The Communities domain name is the same for all communities. You create a unique URL for each community when creating it by entering a unique name at the end of the URL. For example, if your Communities domain name is UniversalTelco.force.com and you’re creating a customer community, you can enter customers to create the unique URL UniversalTelco.force.com/customers.
IMPORTANT NOTE: You can’t change the domain name after you save it.
You can designate a custom domain by entering it in on the Domain Management page. From Setup, enter Domains in the Quick Find box, then select Domains.
Step 4 : Click Save.
Step 5 : Create communities using a wizard that helps you choose a community template that meets your business needs.
For more details on choosing the templates please click here
- Select the template that you want to use.
For demo, we are choosing Build Your Own community template
Build Your Own
Provides the basic pages every community needs: Home, Create Record, Error, Record Detail, Record List, Related Record List, Search, Check Password, Forgot Password, Login, Login Error, and Register. Add more pages and components as needed for the experience you’re building. To refine the look of your community, customize your branding and themes.
- Read the template description and key features, and click Get Started.
- Enter a community name.
- For URL, enter the name of your community.
This name is appended to the Communities domain that you created when you enabled communities for this org.
Click Create.
The community is created in Preview status. Now you’re ready to build and customize or manage and moderate your community.
Step 6 : In Builder tab you can design the UI of the community as needed.
Design your community for the guest users to apply for jobs through community pages
- In Builder tab, go to settings and in General section enable the checkbox for Public Access as shown below.


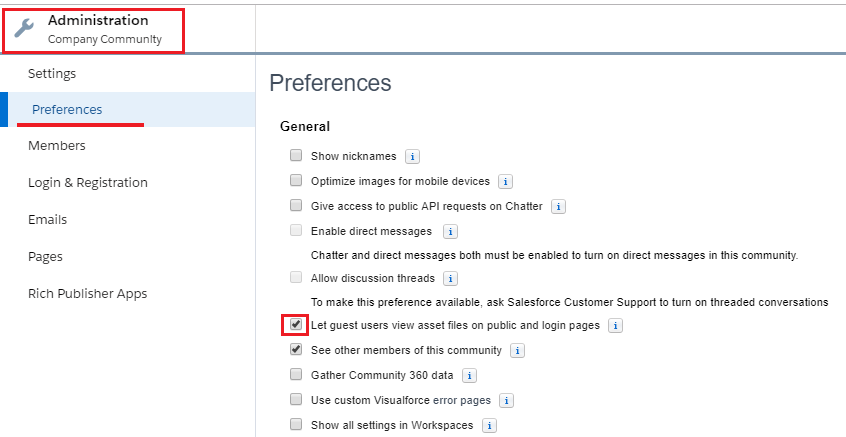
- Go to Administration tab, In preferences section enable the checkbox for “Let guest users view asset files on public and login pages”
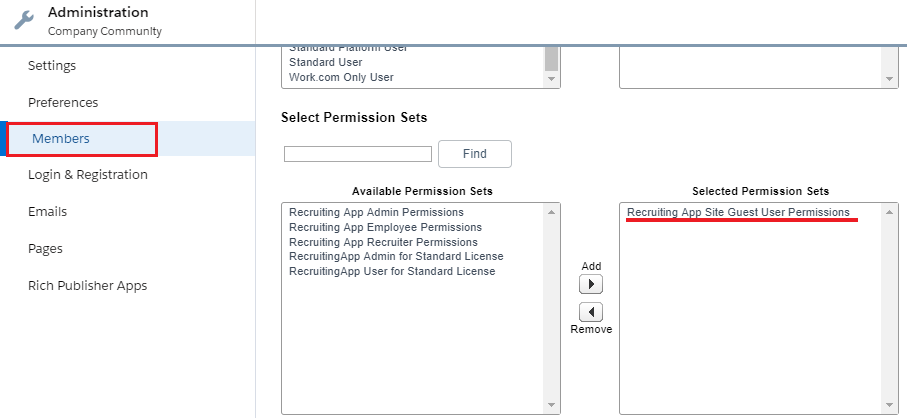
3. From Administration tab, select Members section and assign “Recruiting App Site Guest user Permissions”
4. Then come back to Builder, select Component and search for Tabs, drag and drop Tabs into the community page.
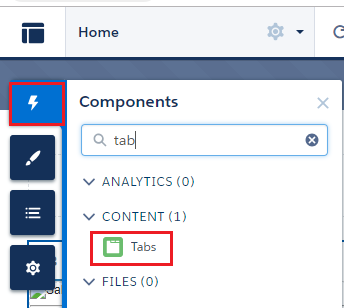
5. Name the tab as Job Listing and enable the checkbox to make the tab publicly available.(This step is optional)

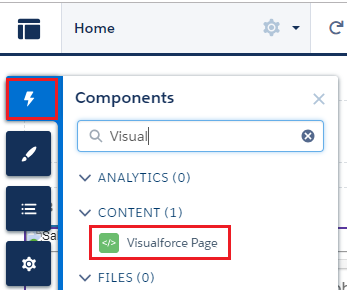
6. Next, from components, search for Visualforce and drag and drop Visualforce pages component under Job Listing tab in community page.
7. Set Page Visibility: Assign Job Listing site to Guest Users as shown in the below images.
- Click on the drop down arrow and Edit Assignment.
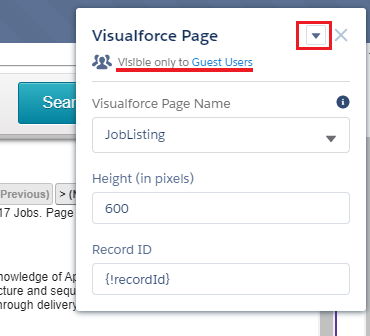
7. Activate and Publish the community.
Site Setup (Legacy)
It is recommended to use community as external site, Please refer Steps to set up Community section in this admin guide.
If you would like to receive applications via an external website using Salesforce sites, follow below steps.
The package already contains Visualforce page for Applying for a job (need to expose it via a site though), Follow Steps mentioned here: http://help.salesforce.com/apex/HTViewHelpDoc?id=sites_configuring_sites.htm
Site Configuration details:
- Create a new Site with below details:
- Site Label: RecruitingApp
- Default Web Address: (keep it blank)
- Active: Checked
- Active Site Home Page: “JobListing” , then Save the site.
- Go to public settings of the site (Profile of guest user : RecruitingApp Profile):
- Click on view users
- Click on the user (site guest user)
- Assign License (this is 2nd Recruiting App license you would be utilizing)
- Go to “Managed Packages” section (at the bottom of the page)
- Click on “Assign Licenses” button
- Check for the “Recruiting App” and click on “Add” button.
- Recruiting App Permissions Setup:
There are two options A. Continue with previous step (while you are on site guest user record) or B. Update “Recruiting App” profile.
Option A:
-
- Go to permission set assignment section
- Click on edit assignment
- Select and add “Recruiting app site guest user permissions” to Enabled Permission Sets
- Click save
Option B:
Or you can update “Recruiting app” profile as below
-
- Enable Read and Create access for “Applicant” object
- Enable Read access for “Job” object
- Enable Read access for “Candidate” object
- Update “Applicant” object’s field level security (FLS) for Applicant fields on the form , click visible check box for following fields:
- Applicant Address, Applicant Education, Applicant Email, Applicant Gender, Applicant Preferred Phone, Candidate, Current Employer, Job, Notice Period (Days), Resume.
- Update “Job” object’s field level security (FLS), click visible check box for following fields:
- Job Number
- Update “Candidate” object’s field level security (FLS), click visible check box for following fields:
- Candidate Email
- Update Label with the Site URL
- Go to Setup “Translation Settings”, Enable Translation Workbench.
- Click on “Add” assign language as “English” and Add the “User” and Save.
- Go to Setup “Custom Labels” Click on “RecruitingApp_ExternalSiteURL”, Click on “New Local Translations/Overrides” button and Select English language and Copy-Paste the Site URL in Translation text.
- Save.
Customizing “Job Details” page
You can customize Job Details page (available via Sites, used for applying via external applicants). You can customize following
- Customize fields to be displayed
- Order of the fields
Steps:-
- Go to Setup > Search for “Objects” in quick search > Select “Job” object > Go to “Field Sets” section. Look for “FieldSetExternalJobListingPage” Field set.

2. Click on Edit.
3. Now you can rearrange the fields, drag and drop which fields need to display so that it will effect on external URL apply page.
4. Save.
Customizing “Apply” page
You can customize Apply page (available via Sites, used for applying via external applicants). You can customize following
- Customize fields to be displayed
- Order of the fields
- Mark field as required (default is optional)
Steps:-
- Go to Setup > Search for “Objects” in quick search > Select “Job Application” object > Go to “Field Sets” section. Look for “FieldSetExternalPage” Field set.
- Click on Edit.
- Now you can rearrange the fields, drag and drop which fields need to display and also make the fields mandatory so that it will effect on external URL apply page.

(Click on wrench icon to make field required)

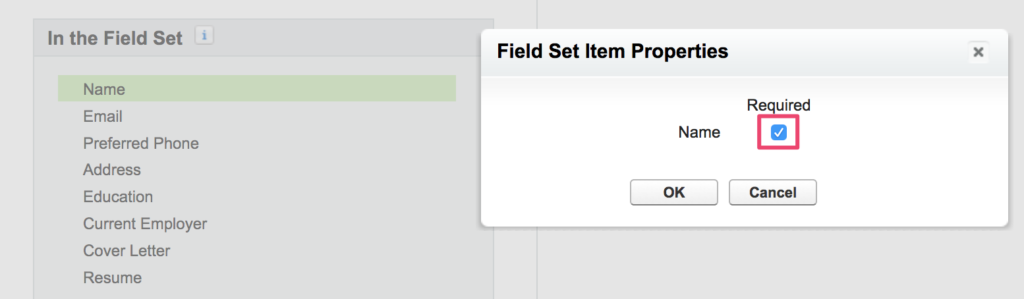
- Save.
Important Note: Sometimes Salesforce.com takes 15-20 mins before the above settings are effective for external site hence you may continue to see the “System config error:” even after doing everything as per above instructions. So take a break … have a good stretch/coffee/tea and come back.. it should work 🙂
FAQ
- How do I change the header text for the apply form ?
- Enable Translation workbench by going to Translation workbench, add users as translators.

- Add translators

- Go to custom label and translate:

Steps for Uninstalling Recruiting App Package
1.Deactivate the Applicant to Candidate Conversion Process in the process builder
2.Remove Permission set from Guest user
- Go to sites from setup
- Click on Site label “Recruiting App”
A.
- Go to Public Access settings
- Click on View users
iii. Click on “Site Guest User, RecruitingApp”
- Scroll Down to Permission set Assignment section and click on “Edit assignment”
- Remove “Recruiting App Site Guest User Permission” and click Save.
B.
- Go to Edit
- look for Active Site Home Page lookupfield.
iii. Change from JobLsiting to AnswersHome
- If the permission set is Assigned to Admin then you may have to remove
- Go to My Settings
- Search for “Advanced User Details” in the quick find box
iii. Scroll down to “Permission Set Assignments” section and Click on Edit Assignment
- Remove “Recruiting App Admin Permissions” and click Save
Data Model

A Job can have many applicants, Applicants are converted to Candidates, usually it’s 1:1 relationship (1 Applicant to 1 Candidate) however same person can apply for various jobs hence many applications by same person (applicant) may result into only one candidate. When an applicant is converted to a candidate, most of the details are copied from applicant to candidate (In case candidate is already existing in the system then latest information is copied over, some of the fields on candidate object have history tracking on so you can see old information in case you need to refer it. A candidate can go through multiple Interviews (1: Many).
Need Help?
Email support@cloudgofer.com