
Recruiting App by CloudGofer
Admin/User Guide Version 1.22
Last updated: Nov 28, 2024
Overview
Recruiting App enables a well defined recruiting process to manage and track progress of Jobs, Job applications and candidates. It is natively built to seamlessly integrate with worlds #1 CRM.
Process Flow
The Recruiting App is based on concept of how a recruiter and hiring manager typically works. Recruiter mainly works on Jobs and Job Applications and Hiring manager on Candidates and Interviews. Job Applications can be automatically converted to Candidates to fast track the hiring process (It is enabled by default in App Settings).
Features
What is special about this application
- Simple yet powerful Applicant Tracking System
- Automated process to automatically convert job applications to Candidates
- Tracks interviews for candidates
- Sends automated emails based on status of applicant
- Seamless UI integration (look/feel) with your website
- “Google for Jobs” compliant job publishing to external site
- Customizable Job Page
- Ample number of Commonly used Job Description Fields
- Facility to create custom fields on Job page
- Control Over fields (to be displayed or keep hidden)
- Customizable Job Apply Page
- Ample number of commonly required fields to capture Applicant’s data
- Facility to create custom fields to Capture Applicant Data
- Control Over fields (to be displayed or keep hidden)
- EEO (Demographic Information) Data Capture
- Upto 5 Files can be attached with Job Application
- Email alert to recruiter when someone apply for a job
- Immediate Thank You mail to the Job Applicant
- Lightning Ready
- External Job Listing
What Recruiter and Hiring Manager can do with this App
- Create and Publish the Jobs internally only
- Create and Publish the Jobs Internally and Externally
- Track the Recruiting Pipeline with Readymade reports and Dashboard
- Design Custom Reports and Dashboard as per requirement
General Information
Type of Users (User Roles)
In CloudGofer’s Recruiting App there can be four type of users namely 1) Recruiting App Admin 2) Recruiter 3) Employee 4) Site/Community Guest User.
Every user types also referred as User Role has a permission set assigned with it. Any user can only do work as per the permission set assigned to his Role. Following are the User Roles and Permission Sets associated with those Roles.
User Roles and Permission Sets
| Role | Applicable Permission Set | Comments |
| Recruiting App Admin | Recruiting App Admin Permissions | Permission set for Recruiting App Administrator to have full access to Jobs, Job Applications (Applicants), Candidates and Interview records including data upload etc. |
| Recruiter | Recruiting App Recruiter Permissions | Permission set for recruiter to have access to Jobs, Applicants, Candidates and Interview records |
| Employee | Recruiting App Employee Permissions | Permission set for Internal employees to access Jobs and Apply for a job. |
| Site/Community Guest User | Recruiting App Site Guest User Permissions | Permission set for external guest user to access Jobs and Apply for a job. |
Note: Assign Recruiting App Site Guest User Permissions when external site/community is used for job listing.
Configuration of Recruiting App – Admin Tasks
Assign Permission set to Admin and other users
Before assigning permissions to the users, first assign “Recruiting App Admin Permissions” to your self. Follow the steps below to assign the Roles and permission set.
Assigning Permission Set and Licenses via User Record
1. Go to user Detail page – For that first go to Setup , Then in Quick Search Box type User and Select the User as shown in the figure below


From the of users list click on the desired user name. You will get the User Detail window as shown below.

Scroll down the user Detail page. Under Permission Set Assignments click Edit Assignments

2. Select Permission set to be assigned, Click Save

Repeat the same steps to assign the permission Set to the User as per his role in the Recruiting App.
3. Assigning Licenses – To be able to work in Recruiting App every user need to have a license assigned to him/her.
When you install Recruiting App, one license is automatically get assigned to you (Admin – System Administrator)
To Assign licenses to other users – Go to Setup –> Quick Find –> Type “Installed Packages” and the Click on the “Recruiting App”


Select the required user and click on “Add” button to assign Recruiting App License to that user.
This successfully completes assignment of permission set and Recruiting App Licenses to the User.
Share the Job Externally
To share the job externally (for the External Applicants), you need to have Sales Force site. You can do it by setting up “Digital Experience”
Setting up a Digital Experience (Previously known as ‘Community’)
Step 1: Enable Digital Experiences:
- Go to Setup, In the ‘Quick Find’ search box type ‘Digital Experiences’
- Click on Settings
- Select Enable ‘Digital Experiences’
- Select a domain name for your Digital Experiences, and click Check Availability to make sure that it’s not already in use. (We suggest that you use something recognizable to your users, such as your company name)
The Digital Experiences ‘Domain Name’ is same for all experiences/sites. You can create a unique URL for each experience/site when you create it by entering a unique name at the end of the URL. For example, if your Digital Experiences domain name is – ‘UniversalTelco.force.com’ and you’re creating a customer experience/site, then you can enter ‘customers’ to create the unique URL – ‘UniversalTelco.force.com/customers’.
IMPORTANT NOTE: You can’t change the domain name after you save it.


- Click ‘Ok’ and then Click on the ‘Save’ button (If nothing happen make sure to disable the “Pop up Blocker”)
Step 2: Create an Experience/Site using wizard:
- Click on the ‘New’ button


- Choose the ‘Build Your Own ‘ template’
- Click on the ‘Get Started Button


- Enter the name of your Experience/Site. e.g. ‘Jobs’ . This name is appended to the Digital Experiences domain that you created when you enabled Digital Experiences for this org.
- Click on the ‘Create’ button
Wait for a minute and you will get the screen as shown in the step 3 below.
Step 3: Build and setup the Experience/Site:
Notice that the Experience/Site is created in Preview status. Now you’re ready to build and customize or manage and moderate your experience/site. (Ignore default content on the Home page, we will be overriding the Home page with the ‘JobListing’ page in later steps).
- Select ‘Builder’ Workspace. ( Alternatively you can Go to ‘Setup’ –> In quick search box type ‘Digital Experiences’ –> Select ‘All Sites’ –> Click on ‘Builder’ in front of your external Site URL)

- Click on the Setting icon, present in the top left panel.

Step 4: Setting up Guest User Profile:
- Click on the profile, For example here it is, ‘Job Profile’ as shown above.
- In the Profile view, Click on ‘Assigned Users’ or “View Users”
- Click on ‘Site Guest User’
- Scroll down to the ‘Permission Set Assignment’ section, Click on the ‘Edit Assignments’ button
- From ‘Available Permission Sets’ select ‘Recruiting App Site Guest User Permissions’ Permission Set and add it to ‘Enabled Permission Sets’
- Click Save
- Scroll down to the ‘Managed Packages’ section, and ensure that the ‘Recruiting App’ license is assigned to the site guest user. If not, click on ‘Assign Licenses’ , Select ‘Recruiting App’ , Click on the ‘Add’ button.
Step 5: Setup Home page:
- Go to ‘Setup’ –> In quick search box type ‘Digital Experiences’ –> Select ‘All Sites’
- Click on ‘Builder’ in front of your external Site URL


- Go to Administration tab
- Select ‘Administration’ from the drop down menu
- Click on the ‘Preferences’ pane and and make sure that the checkbox for ‘Let guest users view asset files on public and login pages’ is enabled.
- Important: Click on the ‘Save’ button at the bottom of the page to save these preferences.

- Click on Save Button
- Go to the ‘Pages’ pane, select ‘Home Page’ type as ‘Visualforce Page’ and then search and select ‘JobListing’ template
- Click Save

Step 6: Activate and Publish the Experience/Site:
- In the ‘Settings’ pane, Click on the ‘Activate’ button and then click on ‘Ok’

- Go Back to ‘Builder’ workspace and Click on ‘Publish’

- On the next screen again click on ‘Publish’ on the next Screen.

Step 7: Complete the Experience/Site setup:
- Go Back to “Salesforce Setup”

- In the ‘Quick Find’ search box type ‘Domains’
- Select ‘Domains’ from the search results
- Click on your Digital Experiences domain name

In Developer Version you will get following window

- Now Click on your Experience/Community Site Label whose site type is ‘Community’

Select Site Home Page and Site Template

- Click on the ‘Edit’ button
- Make sure that ‘Active Site Home Page’ is set as ‘JobListing’ template
- For ‘Site Template’ field use search icon and set it to ‘RecruitingAppCommunitiesTemplate’
- Click on the ‘Save’ button

- Congratulations !! You have completed Experience/Site setup.
Step 8: Update Application Settings:
- Copy “Domain Name URL” .
- If you have specified ‘Path’ , that path also need to be appended to above URL

- Go to the App Launcher and select ‘Recruiting App’

- Go to the ‘App Settings’ Tab and update the ‘External_Community_Or_Site_URL’ setting
- If you have specified the ‘Path’ that path also need to need to be appended in the ‘Setting Value’ for ‘External_Community_Or_Site_URL’

Sharing jobs externally on Experience/Site
To publish the jobs on external Experience Site
You need to Add a sharing rule to share all the Jobs
The rule is (“Posting Status” = “Internal and External” )
- Go to Setup –> In the ‘Quick Find’ search box, search and select ‘Sharing Settings’
- In the ‘Manage sharing setting for’ drop-down menu, select the ‘Job’ object

- Scroll down to ‘Job Sharing Rules’ section
- Click on the ‘New’ button
- Here create a new rule for the Job object, as shown below

** If you have multiple sites present in your environment, make sure to select correct user as displayed in the Step 4 in the above image.
Add Posting Status Field on Job Page Layout
- Go to Set up
- Select ‘Job’ object by Clicking on Down Arrow of ‘Object Manager’ TAB

- Click on ‘Page Layout’ and then on ‘Job Layout’

- Drag to ‘Posting Status’ Field and Place it below ‘Post Externally’ Field.
- Click on the ‘Spanner’ icon and Tick mark the ‘Required’ Box.
- Save the new Page Layout


Once it is done you can post the Job to “Internal” candidates or “Internal and external” candidates.
This can be done by, while creating a New Job, select the desired Posting Status as shown below.

Platform Configurations
Email templates: Update email templates in “Recruiting App” folder to suit your needs.
Custom label: Used for header of the apply page on Site. Update it as per your needs.
Workflow Rules: Update to perform different actions, firing of emails on different statuses of Job application, Candidate, etc.
App Settings


Auto Convert Job Application to Candidate: when set to Yes, Job Applications would be automatically converted to Candidate. Values: Yes, No, Default Value: Yes
External Community Or Site URL: External URL for Job Listing Site or Community. Also, used for link to Google Jobs Schema verification (available on Job detail page) – See Setting Up Community or section below
Resume File on Apply Page: Setting to configure resume file validation on external site Apply page, Default Value: Required. Values: Required, Optional
Data Mappings
The mapping of job application fields to Candidate fields can be configured using mappings.
If you require additional field other than existing fields , you can create a custom field for Job Application object Then you either have to create similar field in Candidate object and map it with Job_Application field or you can simply map it with existing field of Candidate object.
Select the “Mappings” Tab on menu bar and do the required mapping.

With this much Configuration, the Recruiting Manager will now be able to create ‘Job’ , Post it for External Users and Receive Job Applications.
- Go to ‘Jobs’ Tab and click on ‘New Job’


Click here to Share jobs externally using Salesforce Site.
Note on Customization of Job Description Page and Job Application Page
‘Job Listing’ Page and ‘Job Application’ Page is pre-populated with minimum required fields. Ample number of commonly used fields are already present in the Recruiting App. These fields can be added on ‘Job Listing’ page to specify Job requirements in details.
Similarly, you can add any of those available fields on ‘Job Application’ page to capture more data about the Job Applicant.
You can also create and add your own Fields on ‘Job Listing’ page or on ‘Job Application’ Page.
Refer the sections below to Add , Remove built-in fields or create your own custom fields for the Job page or for the ‘Job Application’ page.
Customizing “Job Detail” page
Add remove pre-populated fields on Job page (Job Requirements Display page)
The Job Detail page can be customized for users, both internal and external, as well as data shared via Google job Schema structure using ‘Field Sets’.
You can customize the following attributes of a Job Detail page:
- Select fields to be displayed
- Order in which the fields are displayed
Note1: For internal users, just editing the ‘Field Sets’ of the Job object will be enough to customize the Job Detail Page (as shown in Step 1 below)
Note2: Ensure that the date fields and possibly salary fields are updated so that Google Search can index them and show up in Google Jobs.
To see what Google sees, Go to any job , then click on Google Structured Job URL
Once you click on the above URL, Google will show results of the Job data.
Note3: Date Posted is used to show jobs posted based on timeline (3 days ago, 1 month ago etc.) so to keep the job fresh, you can update the Date Posted field on the Job, must not be greater than today’s date ValidThrough shows the validity of the job. On the Job this field is called “Target Hire Date”. Ensure that this field is in future so that google can list the job as currently open.
Step 1: Editing the ‘FieldSetExternalJobListingPage’ Field Set:
- Go to Setup, In the ‘Quick Find’ search box, search for ‘Objects’ and click on ‘Object Manager’
- Search and select the ‘Job’ Object
- Go to the ‘Field Sets’ section
- Look for “FieldSetExternalJobListingPage” Field Set. Click on it’s Field Label to edit it

- Now you can rearrange the order of the fields that are to be displayed and drag and drop fields to select which fields need to be displayed on the Job Detail page

- Click on the ‘Save’ button
And now you have successfully customized the Job Detail page.
How to Create Custom Fields for Job Page.
To add custom fields, firstly you must create a new field on the ‘Job’ object. Then by editing the ‘FieldSetExternalJobListingPage’ Field Set of the Job object you can customize the Job Detail page to add new field/s to it. This will work for internal users.
If you want to add custom fields to the Job Detail page for external users then in addition to editing the above ‘Field Set’, you will also need to change field/s level security (permissions) and assign these permissions to the Experience’s/Site’s ‘Guest User Profile’
Detailed steps for Customizing a Job Detail Page
Customizing “Apply” page
Add remove pre-populated fields on Job Application Page. (Data fields to collect the data from the Applicant)
You can customize Apply page (available via Sites, used for applying via external applicants). You can customize following
- Customize fields to be displayed
- Order of the fields
- Mark field as required (default is optional)
Steps:-
- Go to Setup > Search for “Objects” in quick search > Select “Job Application” object > Go to “Field Sets” section. Look for “FieldSetExternalPage” Field set.
- Click on Edit.
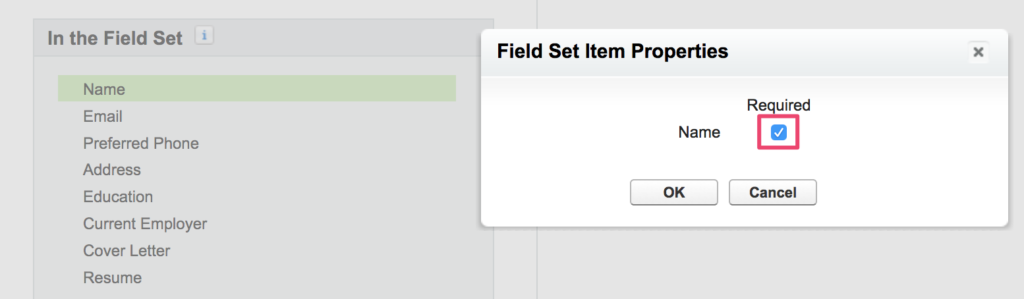
- Now you can rearrange the fields, drag and drop which fields need to display and also make the fields mandatory so that it will effect on external URL apply page.

(Click on wrench icon to make field required)

- Save.
In order to make custom field visible to the External Users (Job Applicants) follow Step2 and Step3.
These steps change field level security (permissions) and assign those permissions to the Experience’s/Site’s ‘Guest User Profile’
Step 2: Enabling the desired fields in a new permission set:
- In the ‘Quick Find’ search box, search and click on ‘Permission Sets’
- Look for the ‘Recruiting App Site Guest User Permissions’ and click on ‘Clone’

- Label this new permission set as ‘Recruiting App Site Guest User Permissions V2‘ and fill the other data as shown below

- Click on the ‘Save’ button
- Now, look for this newly created permission set and click on the ‘Recruiting App Site Guest User Permissions V2‘ to edit it.

- Go to ‘Object Settings’

- Look for the ‘Jobs’ or “Job Applications” object and click on it
- Click on the ‘Edit’ button to start enabling desired fields for the current permission set
- Scroll down to the ‘Field Permissions’ section and mark the ‘Read Access’ checkbox as checked for the desired fields which you wish to display to the external use
- In case of “Job Applications” object you need to mark the “Edit Access” checkbox as checked for the desired fields where you want Applicant to Enter the data.
- Click on the ‘Save’ button
Step 3: Add the newly cloned permission set to the Guest User profile:
*For a Digital Experience*
- In the ‘Quick Find’ search box, search for ‘Sites’ and click on the ‘All Sites’ option, under the ‘Digital Experiences’ heading
- Click on the ‘Builder’ option beside your Site’s name
- Click on the Setting icon, present in the top left panel
- In the General section, click on the Guest User profile, For example here it is, ‘Job Profile’ as shown below

- In the Profile view, Click on the ‘View Users’ or ‘Assigned Users’ button
- Click on ‘Site Guest User’
- Scroll Down to the ‘Permission Set Assignments’ section and click on the ‘Edit Assignments’ button
- From ‘Available Permission Sets’ select ‘Recruiting App Site Guest User Permissions V2′ Permission Set and add it to ‘Enabled Permission Sets’
- Click on the ‘Save’ button
*For a Site*
- In the ‘Quick Find’ search box, search for ‘Sites’ and click on the ‘Sites’ option, under the ‘Sites and Domains’ heading
- Click on your Site’s label
- Click on the ‘Public Access settings‘ button
- In the Profile view, Click on the ‘View Users’ or ‘Assigned Users’ button
- Click on ‘Site Guest User’
- Scroll Down to the ‘Permission Set Assignments’ section and click on the ‘Edit Assignments’ button
- From ‘Available Permission Sets’ select ‘Recruiting App Site Guest User Permissions V2′ Permission Set and add it to ‘Enabled Permission Sets’
- Click on the ‘Save’ button
Important Note: Sometimes Salesforce.com takes 15-20 mins before the above settings are effective for external site hence you may continue to see the “System config error:” even after doing everything as per above instructions. So take a break … have a good stretch/coffee/tea and come back.. it should work 🙂
Display additional Sections on Job Application Page
EEO – Demographic Information (Voluntary self-identification)
Demographic Information fields are populated under RecApp_Apply_Section_2
A section is displayed when Section level header is set to anything other than #BLANK#. All custom labels are applied when those are not #BLANK#
Follow the steps below to change the section header of a Custom Label.
1. Enable Translation
Go to Setup –> Quick Search –> Type Translation –> Select “Translation Language Setting and Click on Enable Button.
In the next screen Select “Add” button and add new language as “English”
![]()
![]()
2. Change #BLANK# to desired Header Text
Go to Setup –> Quick Search –> Type Custom Label –> Select “Custom Label and Click on RecApp_Apply_Section_2_Header and then select “New Local Translation/Override” button as shown in below and next image

![]()

Click on Save.
This will display the section named “Demographic Information” on Job Application page.
This section displays the fields to enter the information regarding
Gender, Sexual orientation, Disability, Veteran, Race/Ethnicity
Additional File attachments and displaying additional sections
In addition to Resume file and Cover Letter, 3 more files and be attached along with Job Application.
Capturing of additional files is populated under RecApp_Apply_Additional_Files_Section
As explained in above section , you have to add translation text (“Additional Files” or any desired text) for Custom Lable. RecApp_Apply_Additional_Files_Section_Header.
This will display the section named “Additional Files” or the text which you have entered, on Job Application Page.
Please refer the image below to know the names of the Custom Labels for each section Header and Section SubText.
You can rename any section header text as per your requirement as described above.

Custom Text for the field labels (To guide, exactly what information is required in that field)
This applies to already available fields as well as Custom fields.
You can display text below the field labels to guide the Job Applicant exactly what information is required in the given field.
For this you have to create a Custom Label for the desire Field
Under the Setup –> Quick Search –> Type Custom Labels –> Click on Custom Labels –> Click on New Custom Label


Note that the “Protected Component” should be “unticked”
In the Value box you can write in descriptive text for your custom field.
Naming Convention for Custom Label : In the “Short Description” field, the custom label should be entered as per the convention shown in the image below.

How to select Section and add fields into the section
If you want to get additional information from the Job Applicant then first activate the section as described in above section and add the fields in the respective sections as shown in the images below.


Email Configuration
Receive Job Applications via Email
Below are steps to Configure Recruiting App to receive job applications via Email, you can also parse emails for extracting specific data from Job applications.
1. Setup Email Service
Go to Setup –> Quick Search –> Type email services –> Select Email Services under Custom Code. and Click on ‘New Email Service’
Type the desired Email Service Name, Select Email2ObjectMainProcessor as Apex Class for processing incoming job application emails.
Ensure to check the Active checkbox.

2. Setup Email Address
Once Email Service is setup, click on “New Email Address” to setup an email address.

You can name it as “jobs”, Make sure to check the Active Checkbox.

The effective email address would be something like jobs@eree33…..apex.salesforce.com.
Once Email address is setup, copy it to set up forwarding from email service provider (in later steps)

3. Configure jobs email address to send emails from jobs@<your-company>.com
setup “Organization-Wide Addresses” and give permissions to appropriate profiles.

You will receive a verification mail on the email address that you enter in the “Email Address” row shown in the figure above.
Verify the org-wide email address by clicking on the verification link

Set up Email forwarding from Email provider (Gmail example)

Copy Salesforce.com Email address from “Copy server side email“ step above.
Go to Recruiting App in Salesforce , Look for email from Google in Job Applications for the verification code.

Click on job application to get the verification code.

Enter the verification code to complete the forwarding setup.

You can now write forwarding rules to forward emails from jobs@<your-company>.com email inbox to jobs email address in Salesforce.
Set up Email forwarding from Email provider (Outlook example)
Copy the salesforce side email address as described in step Copy server side email of above section
Paste the same email as shown in the image below

Renaming/Translating Fields and Labels
For translation of external pages of the Recruiting App.
There are 3 configuration areas required to be leveraged for translating the external pages.
- Translation WorkBench
Usage: Translate custom field names, pick list values, Button and Link label etc.
Go to Settings > Search and look for “Translation Language Settings”, enable for the Language you would like to translate.
- Custom Labels
Usage: Translate custom labels used by app
Go to settings > Custom Labels > Click on Label name > go to Translations section , Click New or Edit existing translation.
- Rename Tabs and Labels
Usage: Translated standard field names on both custom and standard objects: e.g. Job Name (a standard field on custom object)
Go to Settings > search and look for “Rename Tabs and Labels”
Select the Language from the drop down menu
Go to “Custom Tabs” section , Click on Edit on Object name, Change the Record Name e.g. Job Name to Job nombre
How do I change the header text for the apply form ?
- Enable Translation workbench by going to Translation workbench, add users as translators.

- Add translators

- Go to custom label and translate:

How to Rename/Change/Translate Field Labels?
Refer steps in “Renaming Fields and Labels” to enable translation workbench. Once enabled follow below step (as per screenshot) to rename custom fields.

Reports and Dashboard

Job and Candidate pipeline dashboard shows the funnel of respective records by status.
How to grant Account (Org) Login Access ?
Go to My Settings -> Grant Account Login Access
Select Appropriate “Access Duration” for “CloudGoferPartnerOrg Support”.

Go to Setup > Quick Search: Company Profile > “Company Information” > Copy Value give for Salesforce.com Organization ID
Email support@cloudgofer.com notifying that you have granted Login Access and Also share your Org Id* copied in the above step.
Org id* : is located under Setup >Administration Setup > Company Profile > company information

Uninstalling Recruiting App Package
Before we can uninstall the package, we must first remove all the components/settings provided by the Recruiting App
Step 1: Deactivate the ‘Applicant to Candidate Conversion Process’:
- Go to Setup, In the ‘Quick Find’ search box, search and click on ‘Process Builder’
- Expand the ‘Applicant to Candidate Conversion Process’ and then click on the ‘Deactivate’ button
Step 2: Remove Permission set from Guest user:
- In the ‘Quick Find’ search box, search for ‘Sites’ and click on the ‘Sites’ option, under the ‘Sites and Domains’ heading
- Click on your Experience’s Site Label
- Click on the ‘Public Access settings‘ button
- In the Profile view, Click on ‘View Users’ or ‘Assigned Users’
- Click on ‘Site Guest User, ..’
- Scroll Down to the ‘Permission Set Assignments’ section and remove the Recruiting App permission records by clicking on ‘Del’ for the desired record
Step 3: Remove Recruiting App templates:
- Go back to your Experience’s/Site’s setup
- Click on the ‘Edit’ button
- Look for ‘Active Site Home Page’ lookup field
- Replace ‘JobLsiting’ with ‘AnswersHome’ template
- Click on the ‘Save’ button
Step 4: Remove Permission Set from one or more user/s:
- In the ‘Quick Find’ search box, search and click on ‘Permission Sets’
- Click on ‘Recruiting App Admin Permissions’
- Click on the ‘Manage Assignments’ button
- Mark the checkbox as checked for all the users under this permission set and click on the ‘Remove Assignments’ button
- Similarly follow the above 3 steps for all the available Recruiting App Permission sets
Step 5: Uninstall the package:
- In the ‘Quick Find’ search box, search and click on ‘Installed Packages’
- Click on the ‘Uninstall’ option, beside the Recruiting App Package
- Scroll down and mark the checkbox ‘Yes, I want to uninstall this package and permanently delete all associated components’ as checked
- Click on the ‘Uninstall’ button
Data Model

A Job can have many applicants, Applicants are converted to Candidates, usually it’s 1:1 relationship (1 Applicant to 1 Candidate) however same person can apply for various jobs hence many applications by same person (applicant) may result into only one candidate. When an applicant is converted to a candidate, most of the details are copied from applicant to candidate (In case candidate is already existing in the system then latest information is copied over, some of the fields on candidate object have history tracking on so you can see old information in case you need to refer it. A candidate can go through multiple Interviews (1: Many).
Need Help?
Frequently Asked Questions (FAQs)
Q: How to add custom fields to the ‘Job Detail’ page?
A: To add custom fields, firstly you must create a new field on the ‘Job’ object. Then by editing the ‘FieldSetExternalJobListingPage’ Field Set of the Job object you can customize the Job Detail page to add new field/s to it. This will work for internal users.
If you want to add custom fields to the Job Detail page for external users then in addition to editing the above ‘Field Set’, you will also need to change field/s level security (permissions) and assign these permissions to the Experience’s/Site’s ‘Guest User Profile’
Detailed steps for Customizing a Job Detail Page
Q: How to customize the ‘Job Listing’ page?
A: This page unfortunately is not configurable at this point in time. However we are working on an enhancement to enable the same functionality via field sets similar to the Job Detail page.
Q: How do I change look and feel of external jobs/career website?
Design a Visualforce Page and use it as site template.
You can download and use this template to create a Visualforce page.
Download RecAppBaseTemplate.html
Make sure to check the available for … checkbox as shown in the image below
 Once site template is created, Click here to go to “How to set up site template” section
Q: Error while installing Recruiting App: ‘You reached the limit for dashboards run as the logged-in user’ – How to fix this ?
A: To fix this error, you will have to free up a “dynamic dashboard” license by temporarily changing any existing dashboard from “Run as Logged-In user” to a specific user. After doing so, the installation process should run smoothly.
Q: Error while installing Recruiting App: ‘cga__Candidate__c.Rule_for_Duplicate_Candidate: SortOrder must be in sequential order from 1’ – How to fix this ?
A: The sortOrder value of a Duplicate Rule indicates the order of implementation of a rule (which rule to be executed first and which to be executed next and so on) for an object when a duplicate record of that object is encountered.
This error occurs, when multiple Duplicate Rules for the Candidate object have the same sortOrder value (=1), which causes a conflict.
The latest version of Recruiting App already includes a Duplicate Rule for the Candidate object – ‘Rule for Duplicate Candidate’ – which has a sortOrder value of 1 by default, so to fix this error you will have to delete any existing Duplicate Rule on the Candidate object before installing/upgrading the Recruiting App. You can later add your custom Duplicate Rule on the Candidate object, but it must have a sortOrder value greater than 1 (or not equal to 1).
Q. How to Find Version Number ?
Go to Setup “Wheel” Icon at right hand upper corner. –> In ‘Quick Find’ search box. type ‘Installed Packages’ –> Click on ‘Installed Packages’ –> Check the Version Number of the Recruiting App
If Recruiting App is not yet installed, refer “How to Install/Upgrade Recruiting App version 1.20?” section below.

How to Install / Upgrade to Version 1.22 ?
To install / upgrade Version 1.22 visit
https://appexchange.salesforce.com/appxListingDetail?listingId=a0N30000000qpIhEAI
or you can visit
https://login.salesforce.com/packaging/installPackage.apexp?p0=04tIU000000qyTUYAY
Replace login.salesforce.com part of above link with your domain address and upgrade to Version 1.22
How to Install Version 1.26 ?
https://login.salesforce.com/packaging/installPackage.apexp?p0=04tIU000000r4KW
Replace login.salesforce.com part of above link with your domain address and upgrade to Version 1.26
Contact us
Email support@cloudgofer.com
Discuss and Collaborate with Recruiting App community
Sharing Jobs Externally using Salesforce Sites
If you would like to receive applications via an external website using Salesforce sites (Digital Experience is recommended), follow Steps mentioned here: http://help.salesforce.com/apex/HTViewHelpDoc?id=sites_configuring_sites.htm
Site Configuration details:
- Create a new Site with below details:
- Site Label: RecruitingApp
- Default Web Address: (keep it blank)
- Active: Checked
- Active Site Home Page: “JobListing” , then Save the site.
- Go to public settings of the site (Profile of guest user : RecruitingApp Profile):
- Click on view users
- Click on the user (site guest user)
- Assign License (this is 2nd Recruiting App license you would be utilizing)
- Go to “Managed Packages” section (at the bottom of the page)
- Click on “Assign Licenses” button
- Check for the “Recruiting App” and click on “Add” button.
- Recruiting App Permissions Setup:
There are two options A. Continue with previous step (while you are on site guest user record) or B. Update “Recruiting App” profile.
Option A:
-
- Go to permission set assignment section
- Click on edit assignment
- Select and add “Recruiting app site guest user permissions” to Enabled Permission Sets
- Click save
Option B:
Or you can update “Recruiting app” profile as below
-
- Enable Read and Create access for “Applicant” object
- Enable Read access for “Job” object
- Enable Read access for “Candidate” object
- Update “Applicant” object’s field level security (FLS) for Applicant fields on the form , click visible check box for following fields:
- Applicant Address, Applicant Education, Applicant Email, Applicant Gender, Applicant Preferred Phone, Candidate, Current Employer, Job, Notice Period (Days), Resume.
- Update “Job” object’s field level security (FLS), click visible check box for following fields:
- Job Number
- Update “Candidate” object’s field level security (FLS), click visible check box for following fields:
- Candidate Email
- Update Label with the Site URL
- Go to Setup “Translation Settings”, Enable Translation Workbench.
- Click on “Add” assign language as “English” and Add the “User” and Save.
- Go to Setup “Custom Labels” Click on “RecruitingApp_ExternalSiteURL”, Click on “New Local Translations/Overrides” button and Select English language and Copy-Paste the Site URL in Translation text.
- Save.
Please note: Once Site is setup, refer Sharing jobs externally on community to setup external sharing of the jobs.