Email2LeadPro App by CloudGofer
Last updated: July 22, 2023
Link to the AppExchange Listing: Email2LeadPro – Convert Emails to Leads
Link to Email2LeadPro Product Features and Pricing
Setup and Configuration
This admin guide provides step by step instructions to setup email service and configure Email2LeadPro processor. It provides examples of mapping email data to lead fields.
Install Email2LeadPro Processor Package
From AppExchange, Install the Email2LeadPro package.
Link to the AppExchange Listing: Email2LeadPro – Convert Emails to Leads

Create Email Service
Go to Setup , Search for “Email Services” in Quick Find (as shown in the screenshot below) and click on “New Email Service”

Name: Email2LeadPro , select Apex Class: Email2LeadProProcessor
Activate Email service
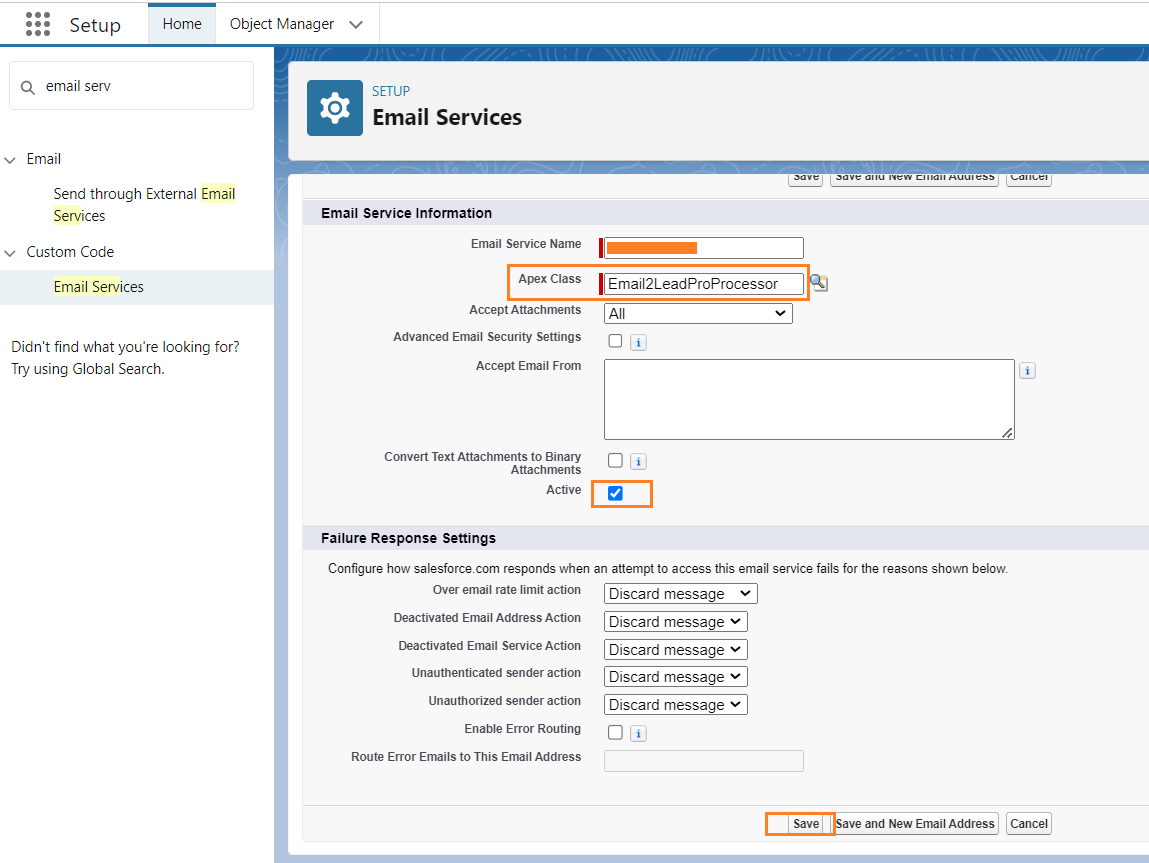
Click Save.
Create “Email Service Address”

Click on “New Email Address”
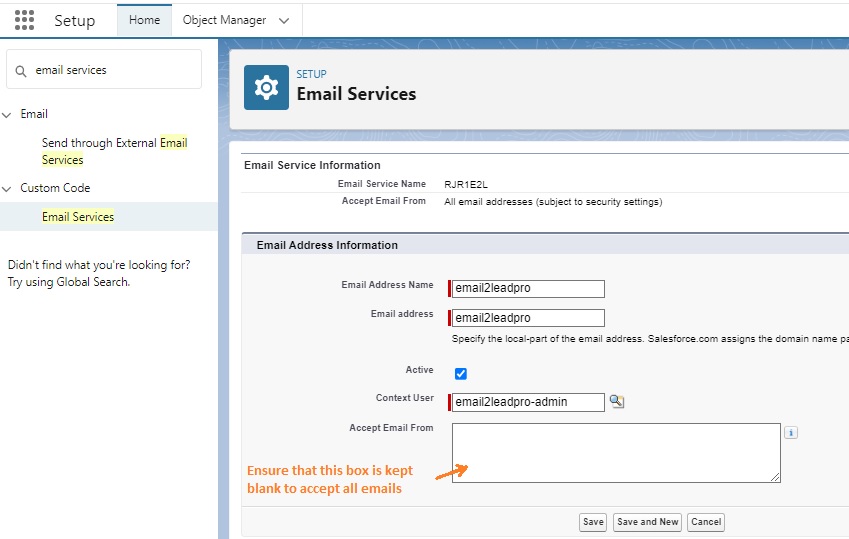
Email address: Email2LeadPro
Accept Email From: <keep it blank> Remove any email address from there
Once saved you should see email address similar to below.

Click View and Ensure that the Email address is activated !!

Configure Email2LeadPro App Settings
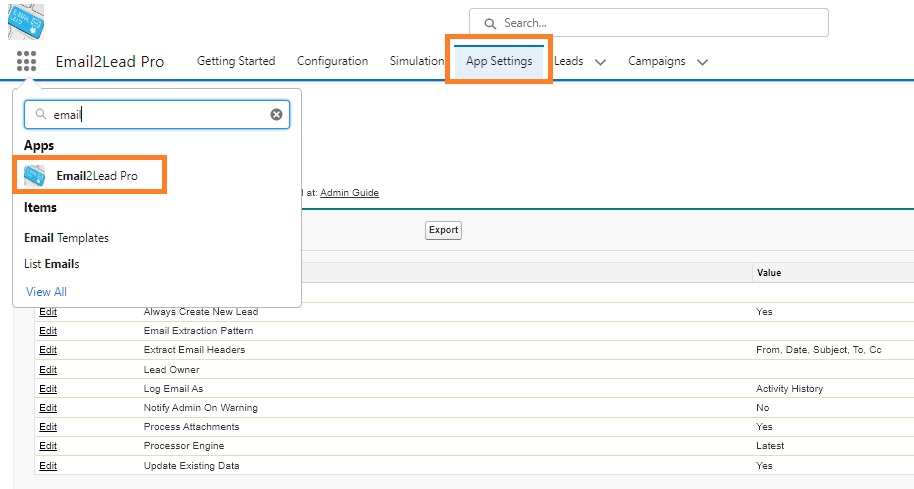
Click on App Launcher and search for Email2LeadPro App
Click on App Settings to change the application settings as per your needs.
-
Admin Emails For Notification
Email address for notification when there is a warning or error while processing email. Multiple email addresses can be entered by separating by comma e.g. abc@cloudgofer.com, xyz@cloudgofer.com
-
Always Create New Lead
When the value of “Always Create New Lead” is set as ‘Yes’ then the application allows to create new lead instead of updating existing matching lead. When the value is set as ‘No’ or ‘None’ then Email with same Last Name, Email ID, Title will update the values of matching existing lead.
-
Email Extraction Pattern
Advanced setting for special scenarios, keep it blank unless advised by support team.
-
Update Existing Data
This setting is applicable only when “Always Create New Lead” is set to No
Data means non blank value
| NEW Data | OLD
(Existing Data) |
Update
Existing Data = Yes |
Update
Existing Data = No |
| – | – | – | – |
| ABC | – | ABC | ABC |
| ABC | PQR | ABC | PQR |
| – | PQR | PQR | PQR |
Note: – = blank
-
Extract Email Headers
Extract Email Header setting configures extraction the header data from the email
E.g. From, To, Cc, Bcc, Date or ExtractAllHeaders to extract all headers for logging (for initial testing)
This information is added to the Notes or Activity history (depending on Log Email As Setting).
-
Lead Owner
Use it to set Lead Owner at App level , Provide either Salesforce.com user id or queue id
E.g. 0056A000001D46x or 00G6A000001Is2i , you can override lead owner at data setting / template level
by using $AppSetting.Lead_Owner
-
Log Email As
The emails will be attached as Activity History or Note to the Lead depending on the “Log Email As” setting
Valid values are: File, Activity History, Note, Email, None (None = Email is not logged).
Incoming email on lead(new/existing) can be logged as an email instead of a task by setting the ‘Log Email As’ field value to Email.
-
Notify Admin On Warning
The value of Notify Admin On Warning is set as ‘Yes” then the admin receives the warnings while processing inbound messages else only notified when there is Fatal Error.
-
Process Attachments
Set it to “Yes” to allow Attachments to be processed. Attachments from email are attached to the lead.
-
Processor Engine
Always Set Processor Engine value to ‘Latest’ to avail Latest version of Email2LeadPro.
Configure Data Extraction Settings
Important note: Please ensure to setup Email Service (Refer Step 3) before starting with Data Settings.
Best Practice tip: Send test email to test the email service before adding any data settings, You can find data format of the email by reviewing email body in the activity history of the Lead created by Email2LeadPro.
Basic Configuration
To configure Data Settings, Go to the ‘Configuration’ tab.
To add parsed/extracted data from an email into the lead we must first map that email data to a Lead field (default or custom). This is done by creating a record in the data setting. To create a new mapping (data setting record), click on the ‘Add New Value’ button.
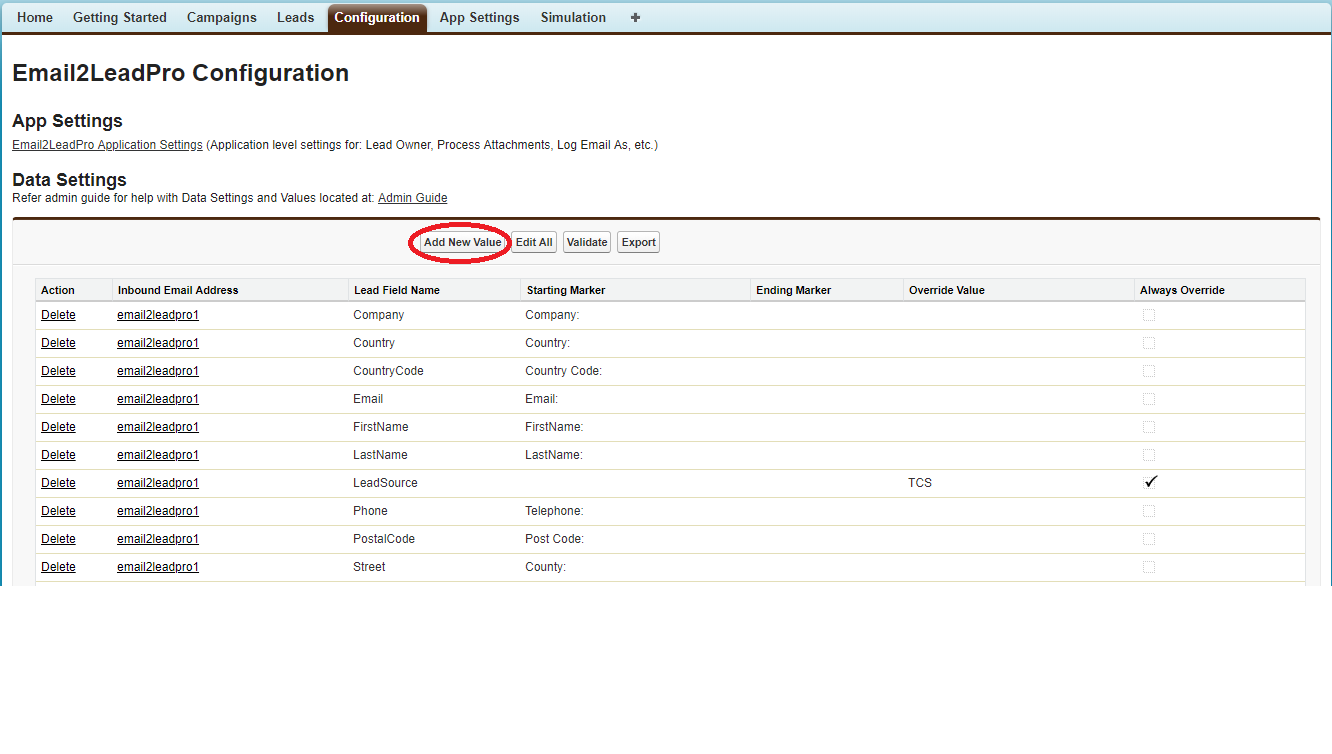 Below is an example of mapping email data to Lead fields. This is optional, configure only if you would like to parse the contents of the email.
You can add multiple mappings (data setting records) for a single lead field, for example, see ‘MobilePhone’ field, if the email has either Mobile: or M: as starting marker, you can add both.
| Lead Field Name | Starting Marker | Ending Marker | Override Value | Always Override |
| Name | Name: | |||
| Phone | Phone: | |||
| Email Address: | ||||
| Title | Title: | |||
| Company | Company: | |||
| MobilePhone | M: | |||
| MobilePhone | MobilePhone: | |||
| LeadCampaign | Campaign Name or Salesforce ID of the Campaign | Check | ||
| Description__c | Description: | $Email.ENDOFMESSAGE | ||
| Email2__c | Email2: | – | Check | |
| EmailHeaderField__c | $EmailHeader.From | Check | ||
| Description__c | Description: | $EmailHeader.Subject | Check |
You can also map email data to custom lead fields. For Example, in the above table see ‘Email2__c’ field. You have to make sure that the custom field is created on the Lead object before hand so that it is available for selection when adding a new mapping.
Using Regular Expression
Regular Expression (Regex) is a powerful tool for parsing and extracting data from an email in a much more sophisticated way. Regex can be used in Starting Markers and/or Override Markers.
Regex is basically a sequence of characters that define a search pattern which helps us extract data in the form of one or more capturing groups. To learn how to write regex : (https://docs.oracle.com/javase/tutorial/essential/regex/)
To use Regex in the Starting Markers and/or Override Markers please follow the below syntax :
$Rx:n:<regex>
$Rx is a keyword which lets Email2LeadPro know that regex is being used.
n identifies which capturing group to pick up from the extracted data. The value of n can range from 0 to 7 (0 is default capturing group).
regex = Your regular Expression.
Examples:
1. Finding and extracting “Website:”
$Rx:1:(?s)(?:Website : )(.*?)(?:\n)
https://regex101.com/r/l0dA2h/1
2. Finding phone after 2nd “Phone:”
$Rx:1:(?si)(?:Phone:).*(?:Phone:)([\s?+\d\w-()]*?\n)
https://regex101.com/r/vb1OED/2
3. Finding characters after 2nd “Name:”
$Rx:1:(?si)(?:Name:).*(?:Name:)([\s?\w+]*?\n)
https://regex101.com/r/2rjBmV/1
Special markers and keywords
| Special Marker/ Keyword | Usage | Purpose |
| $Email.STARTOFMESSAGE | Starting Marker | Extract text from START of email message1 |
| $Email.ENDOFMESSAGE | Ending Marker | Extract text till END of email message |
| $EmailHeader.FROM | Override Value | “From” part of Email |
| $EmailHeader.Subject | Override Value | Subject of Email |
| $EmailHeader.TO | Override Value | “To” part of Email |
| $EmailHeader.CC | Override Value | “CC” email address |
| $EmailHeader.<HeaderName> | Override Value | Any value from Email Header 2 |
| $AppSetting.<App Setting Name> | Override App Setting | Now you can Override App Setting at email Template level e.g. Always_Create_New_Lead can be changed at Email template level to No (while it can be Yes at App Setting level)3 |
- e.g you can use this for Description field as shown in above example
- Header Name = FROM, TO, CC, Subject (Use ExtractAllHeaders to see all the values refer App Settings section)
- $AppSetting.<App Setting Name>: If you have a business case to update Email Opt Out flag when someone unsubscribes , you can still keep “Always Create New Lead” to Yes for creating new Sales / Marketing leads however for unsubscribe you can update existing lead by adding $AppSetting.Always_Create_New_Lead and setting it to No.
- Click on ‘Add New Value’ button to map new fields
- Click on ‘Edit All’ button to edit the existing field mapping
- Click on ‘Save All’ button to save all the field mapping
Differentiate multiple templates by ‘Inbound Email Address’

Some more Data Setting examples: For more supported fields: see Supported Fields
Testing and Troubleshooting
Send Email
For testing the configuration: Email below text to the email service created above (screenshot below for reference).

Name: Joe Bloggs
Phone: (123) 456-7898
Email Address: joe.bloggs@cloudgofer.com
Title: Chief Architect
Company: Acme Inc.
MobilePhone: (123) 456-7895
Description: this is a test contact to test out email to lead generation program, this is a long text to ensure that long text can be processed and saved along with lead, this is a long text to ensure that long text can be processed and saved along with lead, this is a long text to ensure that long text can be processed and saved along with lead, this is a long text to ensure that long text can be processed and saved along with lead, this is a long text to ensure that long text can be processed and saved along with lead, this is a long text to ensure that long text can be processed and saved along with lead, this is a long text to ensure that long text can be processed and saved along with lead, this is a long text to ensure that long text can be processed and saved along with lead.
Verify Lead data
Go to Salesforce.com Lead tab and See if the Lead record is created and all the fields as per custom settings and email sent above are populated correctly.
Simulation Mode
Internally you can check for lead creation using simulate button
Note: Only “Subject” and “From” are available as Email header data in Simulation mode.
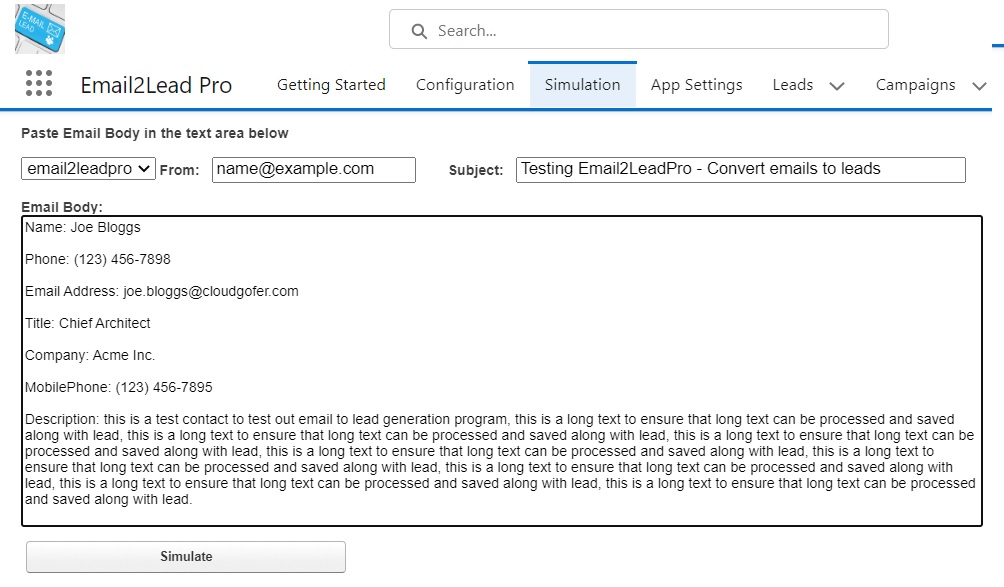
Error Messages displayed during simulation and possible fixes
| Error Code | Possible Fix |
| INVALID_EMAIL_ADDRESS | Check App Setting “Admin Emails For Notification” for valid email address(s) |
| NO_MASS_MAIL_PERMISSION | Check Deliverability setting (see Deliverability section below) |
Deliverability
To get the Warning Message via email(Route error email address mentioned in email service) or in Configuration tab after simulate. Deliverability Access level must be “All email”
(In Quick Find/Search>>Deliverability. Click on Access level drop down and select “All email” and save)

Lead Fields Usage
Supported Fields
| Field Name | Type | Field Data Size | Comments |
| Address | ADDRESS | Complex Field | Address can be populated using Its components (Street,City,State,Country) |
| AnnualRevenue | CURRENCY | ||
| City | STRING | 40 | |
| Company | STRING | 255 | |
| CompanyDunsNumber | STRING | 9 | |
| ConvertedDate | DATE | System Field | |
| Country | STRING | 80 | |
| CreatedDate | DATETIME | System Field | |
| Description | TEXTAREA | 32000 | |
| 80 | |||
| EmailBouncedDate | DATETIME | Date field | can be updated (not creatable) |
| EmailBouncedReason | STRING | 255 | can be updated (not creatable) |
| Fax | PHONE | 40 | |
| FirstName | STRING | 40 | |
| Industry | PICKLIST | 40 | |
| LastName | STRING | 80 | |
| LeadSource | PICKLIST | 40 | Always Override : Checked |
| MobilePhone | PHONE | 40 | |
| Name | STRING | 121 | |
| NumberOfEmployees | INTEGER | 0 | |
| PostalCode | STRING | 20 | |
| Rating | PICKLIST | 40 | |
| Status | PICKLIST | 40 | |
| Street | TEXTAREA | 255 | |
| Website | URL | 255 |
Special supported Fields
| Field Name | Type | Field Data Size | Comments |
| LeadCampaign | TEXT | 100 | Override Value: Campaign Name / Campaign SFDC ID
Always Override: Checked Starting Marker: Blank Ending Marker: Blank |
| RecordTypeId | ID | 15/18 | To get the record type id, go to Setup > In Quick Search , search for Record Types, Go to Record Type under Leads, Click on the Record Type you wish to use, You will see id in the URL (for example: https://na50.salesforce.com/setup/ui/recordtypefields.jsp?id=0126A000000LpPz&type=Lead&setupid=LeadRecords) |
Unsupported Fields
| Field Name | Type | Field Data Size | Comments |
| ConvertedAccountId | REFERENCE | 18 | |
| ConvertedContactId | REFERENCE | 18 | |
| ConvertedOpportunityId | REFERENCE | 18 | |
| CreatedById | REFERENCE | 18 | |
| DandbCompanyId | REFERENCE | 18 | |
| GeocodeAccuracy | PICKLIST | 40 | |
| Id | ID | 18 | |
| IsConverted | BOOLEAN | System Field | |
| IsDeleted | BOOLEAN | System Field | |
| IsUnreadByOwner | BOOLEAN | System Field | |
| Jigsaw | STRING | 20 | |
| JigsawContactId | STRING | 20 | |
| LastActivityDate | DATE | System Field | |
| LastModifiedById | REFERENCE | 18 | |
| LastModifiedDate | DATETIME | System Field | |
| LastReferencedDate | DATETIME | System Field | |
| LastViewedDate | DATETIME | System Field | |
| MasterRecordId | REFERENCE | 18 | |
| SystemModstamp | DATETIME | System Field | |
| PhotoUrl | URL | 255 |
How to grant Account (Org) Login Access ?
Click on View Profile and then on Settings

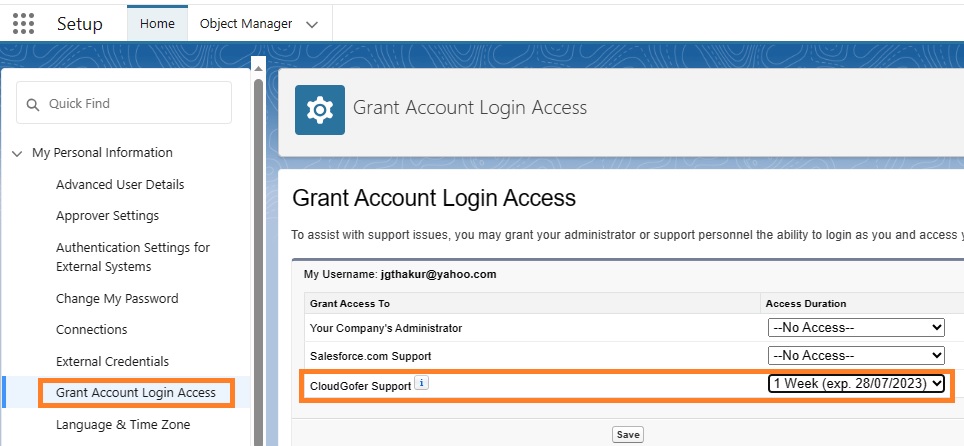
Click on Grant Account Login Access
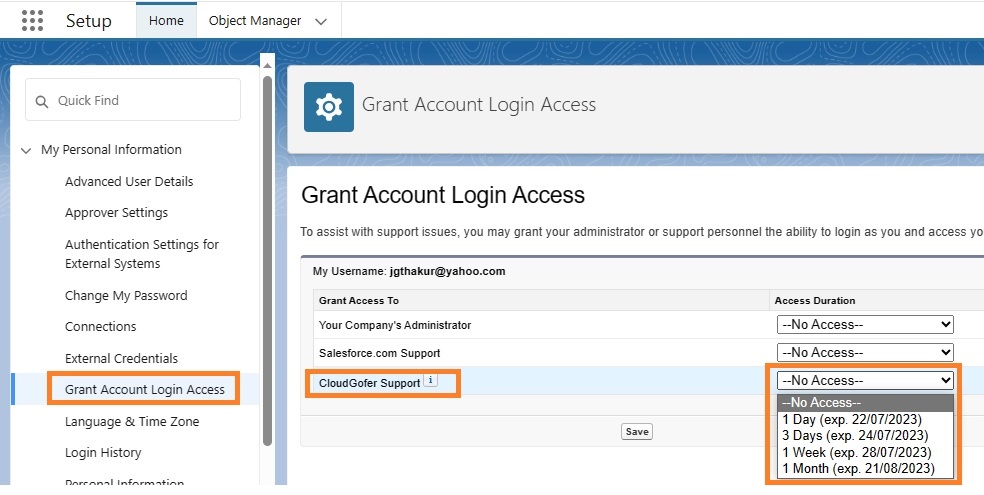
Select Appropriate “Access Duration” for “CloudGofer Support” as shown in the figure above
Go to Setup > Quick Search: Company > “Company Information” > Scroll down and Copy the Value given for Salesforce.com Organization ID
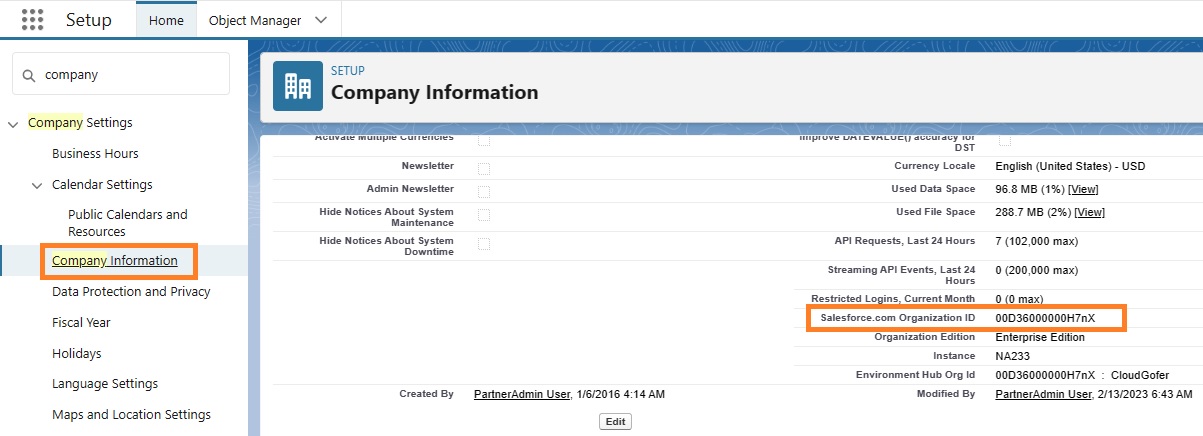
Email support@cloudgofer.com notifying that you have granted Login Access and Also share your Org Id* which is copied in the above step.
Enable Processing of attachments
- First enable Accept Attachments by going to Email Service, please see screenshot below,
Select “Text Attachments” if you expect mostly text attachments, if you expect images, word docs, videos then select Binary Attachments”, if you would like accept any type of attachments then select “All”.

- Go to App Settings tab and enable Processing of attachments by setting “Process Attachments” to Yes.
Need help configuring Email2LeadPro App?
Please drop us an email at support@cloudgofer.com along with following
- Export of Data Settings
- Export of App Settings
- Copy of Email you are trying to process as attachment to this email
- Describe issue you are having or Error message you are seeing
We are here for your success !!
Gmail Integration/Forwarding
Below are the steps for forwarding email from gmail.
- Copy the email address created from Email Service.

- Go to gmail click on Settings>>Forwarding and POP/IMAP>>Add a forwarding address.
Once you add the email address g0 to Email2LeadPro App and click on Leads Tab . The email from google would create a lead, Open the lead
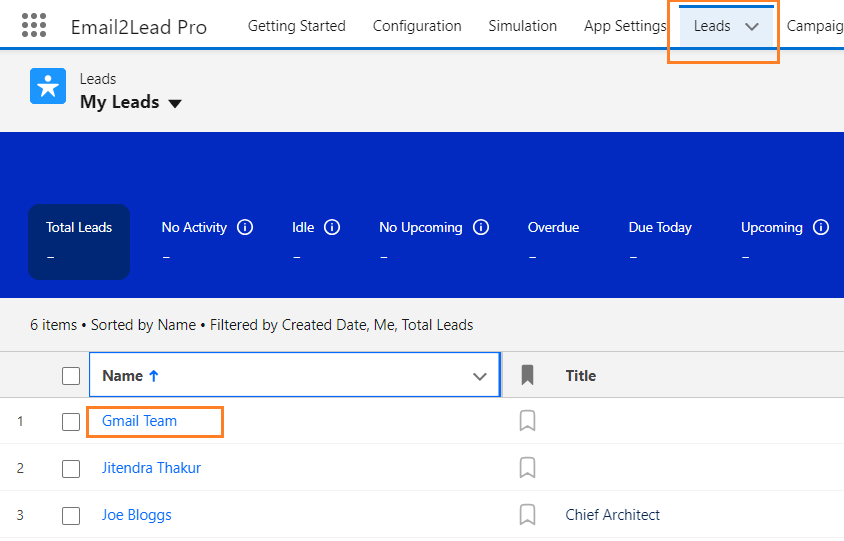
Then Open the email attached to the lead and Click on the Confirmation link received in the email.

Again Go to Gmail Settings — Forwarding and POP/IMAP — Enable forwarding as show in the image below and then Click on ” Save the Changes”.

How to find Salesforce.com User Id for a user ?
Below are the steps for finding user id for a user
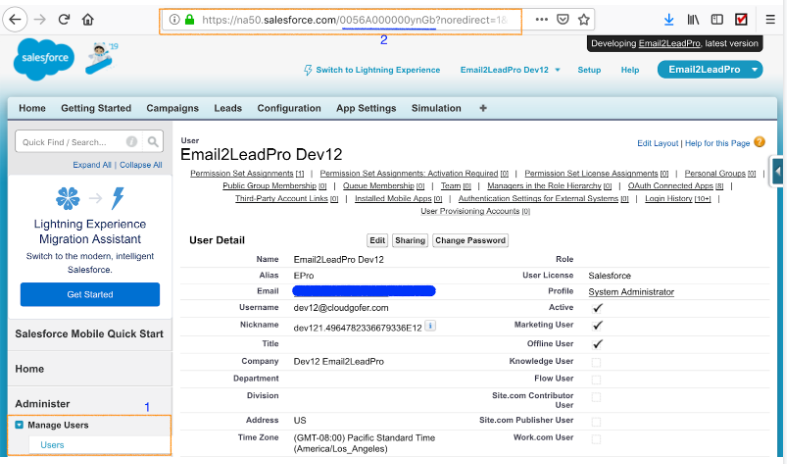
- Go to Manage Users in Setup
- Click on Users
- Select User you would like to get user id for
- Select User id from the URL as shown below
How to upgrade?
Need Help?
Contact Us
Email support@cloudgofer.com
Discuss and Collaborate with Email2LeadPro Community Forum
Frequently Asked Questions (FAQs)
Q: Is there a way to ignore emails from certain domains ?
A: While the Email2LeadPro App does not provide an exclusion list option, but it does provide an inclusion list option, so you can create a list of domains (or email addresses) that you want Emai2LeadPro to accept emails from. The steps, to do the same, are as follows:
- Go to Steup, In the Quick find search box, search and select ‘Email Services’
- Look for your Email2LeadPro Email Service, click on the ‘Edit’ action to edit it
- In the ‘Accept Email From’ field enter a comma separated list of domains/email addresses
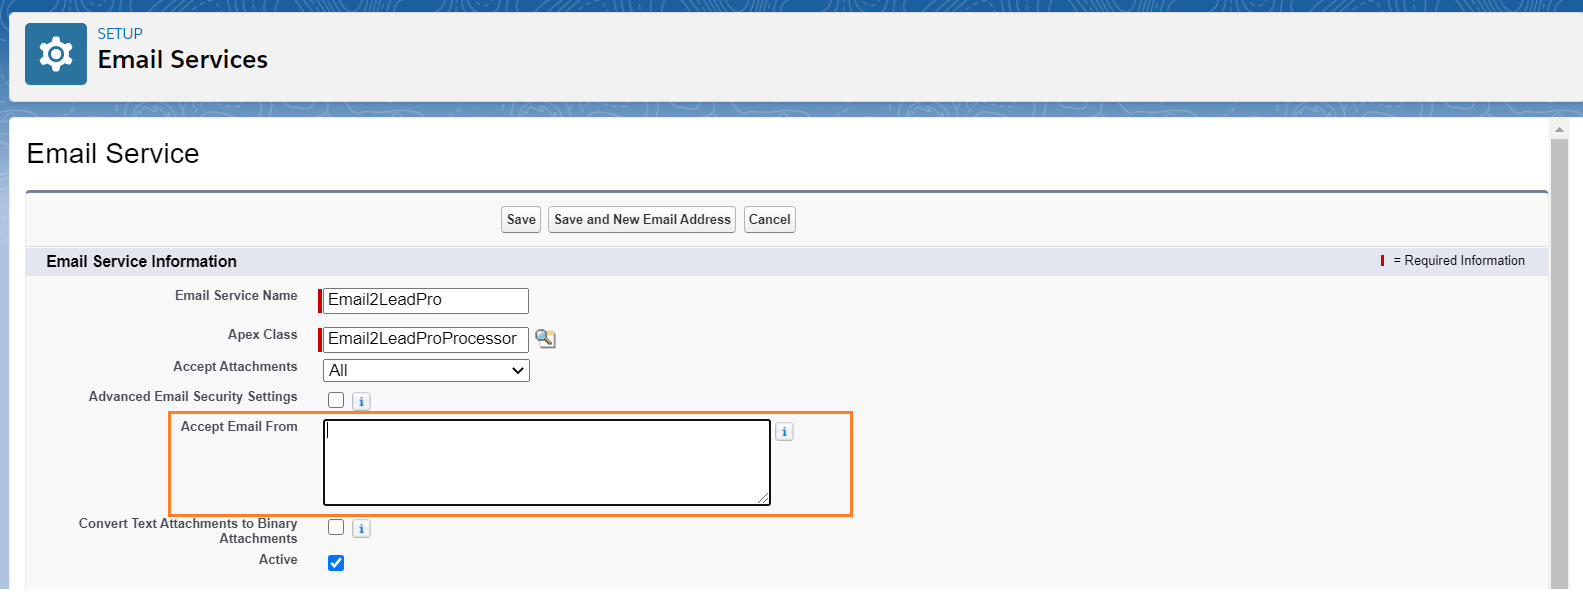
- Click on the ‘Save’ button
Alternatively, you can also filter the emails being forwarded to the Email2LeadPro App by changing the settings of your Email Service Provider. For e.g. in Gmail you can set up a forwarding rule to filter and forward only selected types of emails.
Email2LeadPro Package Un Installation
To Un Install Email2LeadPro Application, you have to carry out following steps.
First you have to delete Email Addresses associated with the email service associated with “Email2LeadProProcessor” Apex Class.
1) In the SetUp –> Quick Find –> Type “email Service”
Under Custom Code Select “Email Services”
And select the “Email Service” associated with “Email2LeadProProcessor”

2) Click on “View” as shown in the figure below
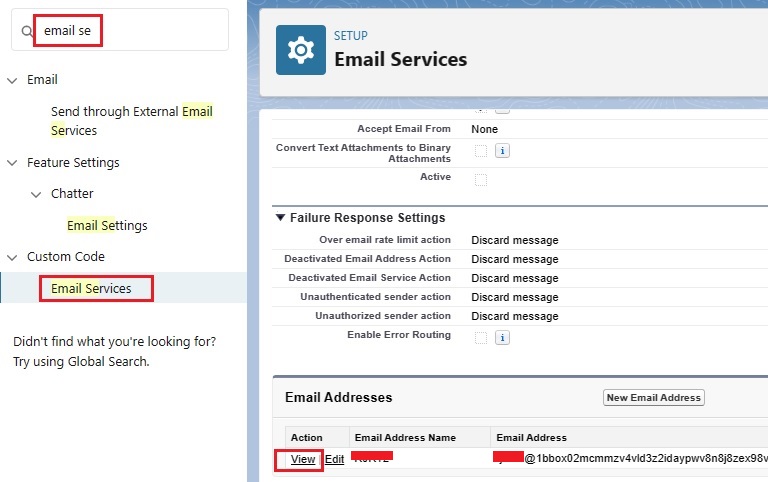
3) Click on “Delete” and then click on Ok button
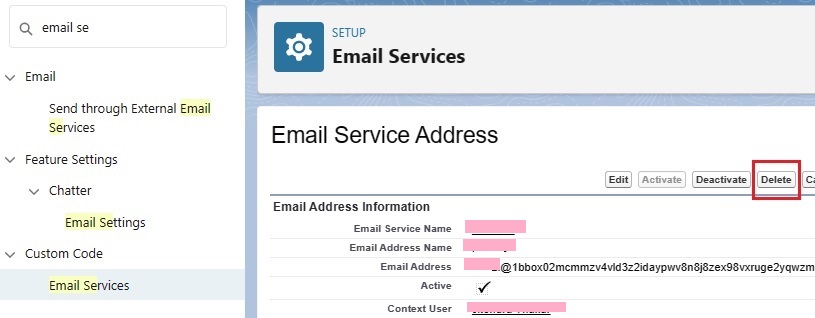
If you have multiple email addresses delete those addresses.
Now you have to delete the “Email Service Associated with “Email2LeadProProcessor” Apex Class
4) Again locate the “Email Service” associated with “Email2LeadProProcessor”
Select “Delete” and click on OK button
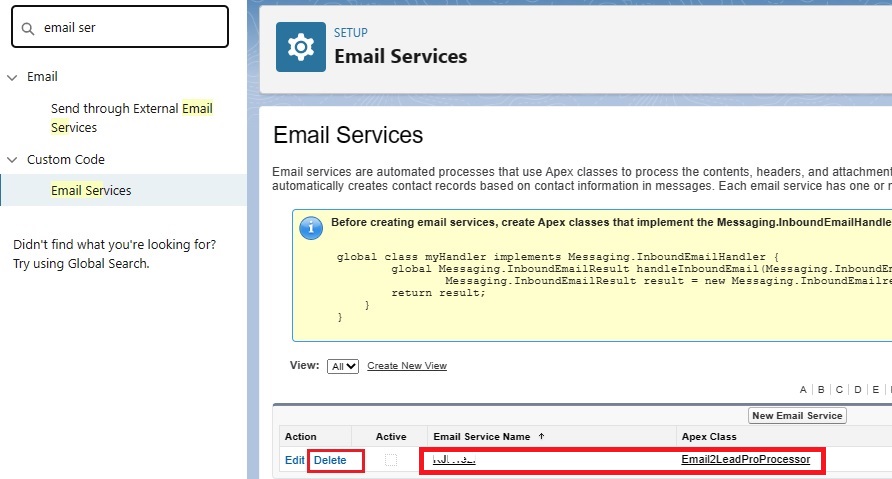
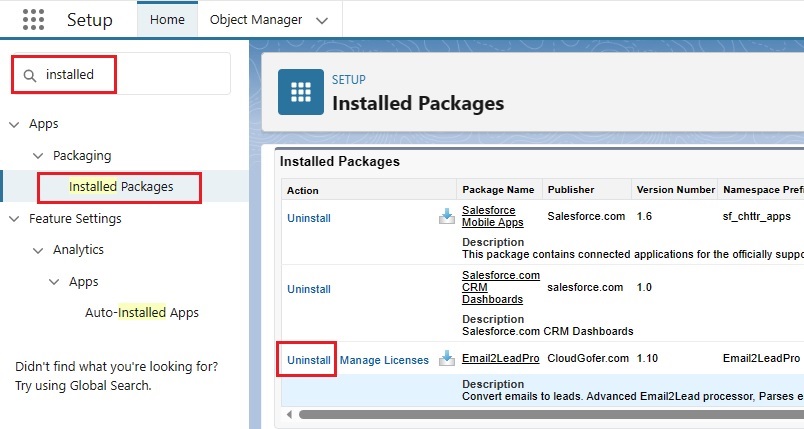
5) In the Set Up –> Quick Find –> Type “Installed Packages”
Under Packaging Click on “Installed Packages”
Select “Un Install” Email2LeadPro Package



6) Scroll down to the bottom. Select Appropriate Radio Button
Tick mark “Yes”
And Click on “Un Install” Button.
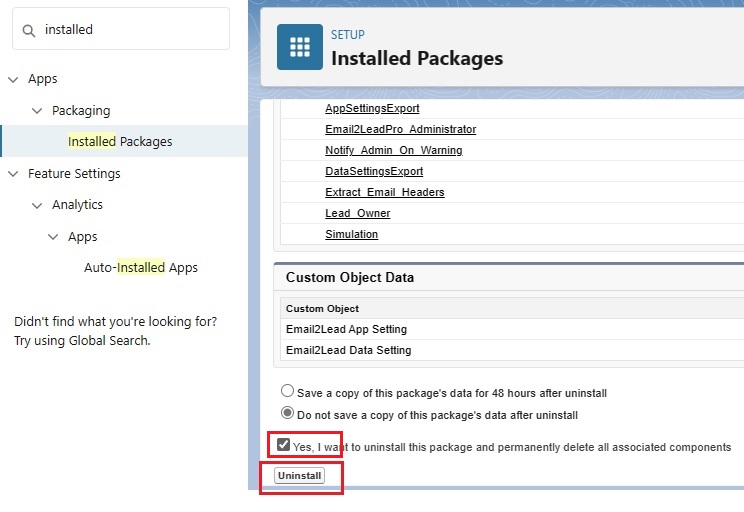

This will Un Install “Email2LeadPro” Application
What’s new
For upgrade steps, please see How to Upgrade? section above.
Version 1.10
- Added Reports and Dashboards tabs
- Better handling of imported data extraction settings
- Performance improvements
- Updated admin guide links from within the app
Version 1.9
- Added powerful regular expressions capability $Rx:n:<regular expression> (n is capturing group, use 0 for default)
- Added Picklist and Multi-Select Picklist support
- Increased length for starting marker from 50 to 100
- Fixed bug: When “Always Create New Lead” = No, program was picking converted lead. Now converted lead will not be used for update. Updated lead matching logic
- Fixed bug: Single quote in LastName, Company, Title, Phone was causing dynamic SOQL to fail. Added additional try catch for each matching query to harden the code/program.
- Simulation: Added From and Subject Email Headers (to simulate headers extraction)
- Simulation Text area added style to prevent removal of spaces: added resize none, overflow and hidden attributes.
Version 1.8
- Added capability to have multiple starting and ending markers for one field. For example: MobilePhone field can have two sets of starting markers. M: and Mobile:
- Added field to track number of emails processed (See App Settings)
- Fixed validation message in configuration to ignore standard restricted lead field: GeocodeAccuracy
- Added watermark “– processed by Email2LeadPro” to Notes/Activity history
- Added permission set “Email2LeadPro Administrator” to assign to additional Email2LeadPro admins who are having non System administrator profile.
Version 1.7
- Better Email address capturing by using pattern / matcher
- Added Email Header for “From” and “Subject” in Simulation
- Updated links to admin guide (new location)
Version 1.6
- Fixed issue with triggering of Lead Assignment Rule, If Lead Owner is not configured default lead assignment rule will be used.
Version 1.5
Version 1.5 brings enhancements all around, making the app much more versatile and powerful.
- AppSettings can be now be configured for specific email template in data Settings (Configuration)
- Improved Lead update logic (added App setting: Update Existing Data)
- Added validate functionality (Validate button in Configuration tab) to check possible missing configurations e.g. required field not defined in data settings (Configuration)
- Separated Simulation functionality in it’s own tab for better user experience (Please manually add the simulation tab from (+) all tabs.
- Add links to inbound email address for easier copy of email address for sending emails
Version 1.4
Version 1.4 is all about improvements under the hood
- Improved robustness of the app
- Resolved White spaces bug in data settings in Configuration page.
- Improved trimming of white spaces from data including trimming of non-breakable white-spaces, Improved email data trimming logic
Version 1.3
- Export functionality: Export data Settings and App Settings. Backup your config and import in other environments. Also, share configuration with support team for faster reproducing of the issue and resolution.
- Fixed “Open Case” url for Web to Case functionality from www to webto.
Version 1.2
- New App Settings Page
- Changed default for App Setting: Notify Admin On Warning to NO
- Fixed: Selection of Error Routing email address corresponding to Email Service
- Added some “Please wait…” messages while editing Data Settings
- Streamlined code for Configuration and App Settings pages
- Improved Error handling and reporting (e.g. Graceful handling of email deliverability setting when it is set to No Access or Systems Emails).

